


A complete, done-for-you 4-week strength training program built specifically for women over 40 who are starting from zero. Every session, every exercise, every set and rep — planned out so you never have to guess what to do next.
Before You Start: What You Need to Know
This program was designed with one principle at its core: do less than you think you can in week one. That’s not a soft suggestion — it’s the most important instruction in this entire guide.
The instinct when starting something new is to go all-in. You’re motivated, you have the energy, and holding back feels counterproductive. But after 40, your connective tissue — tendons, ligaments, cartilage — adapts more slowly than your muscles do. You can get strong enough to lift heavy before your joints are ready to handle it. Starting conservatively isn’t weakness. It’s the strategy that keeps you training consistently for months instead of stopping at week three with a tweaked knee or a pulled shoulder.
Here’s the promise this program makes: if you follow it as written — including the weights guidance, the rest days, and the progression — by week 4 you will be noticeably stronger, moving better, and feeling things about your body that are hard to describe until you feel them. Not just physical things. The confidence that comes from consistently doing something hard, showing up for yourself three times a week, and watching your numbers go up — that compounds.
Three sessions per week on non-consecutive days (Monday / Wednesday / Friday works well — adapt to your schedule). Each week has two sessions: Session A and Session B, alternating so you train each pattern 1.5 times per week. Full-body every session — no body-part splits. Rest or walk on non-training days.
If you have diagnosed osteoporosis, recent joint replacement surgery, cardiovascular disease, or uncontrolled hypertension — speak with your doctor before starting. If you’re generally healthy with no diagnosed conditions, you can begin today. Read our full guide on how to start lifting weights at 40 for the complete context on training safely.
Equipment Needed
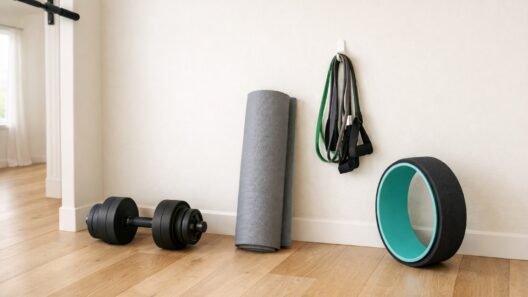
This program requires minimal equipment. Here’s exactly what you need:
| Item | Why You Need It | Starting Weight |
|---|---|---|
| Dumbbells — Light pair | Upper body exercises, warm-up movements | 5–10 lbs each |
| Dumbbells — Medium pair | Lower body exercises, rows | 12–20 lbs each |
| Resistance band (tube with handles) | Band pull-aparts, face pulls, lateral work | Light resistance |
| Exercise mat | Floor work — floor press, dead bug, glute bridge | — |
| Sturdy chair or low bench | Support for single-arm rows, step-ups (optional) | — |
That’s the complete list. If you’re unsure which dumbbells to buy, our tested guide covers the best options at every price point: Best Adjustable Dumbbells for Women Over 40. For bands, see our Best Resistance Bands guide.
The Warm-Up You’ll Do Before Every Single Session
After 40, the warm-up is not optional. Cold muscles, stiff joints, and a nervous system that isn’t activated yet are a combination that produces both poor performance and injury risk. Five to eight minutes of deliberate warm-up before every session is part of the program — not a preamble to it.
Do this warm-up in order, every time:
Lift knees to hip height, swing arms naturally. Gets your heart rate up and starts waking up your hip flexors and core.
Full range, controlled. Warms up the shoulder joint — one of the most sensitive joints after 40.
Stand on one foot, draw big circles with the other knee. Lubricates the hip joint and activates glutes.
No weight. Sit down and back, 3-second descent. This is movement practice and tissue warm-up simultaneously.
On hands and knees. Arch and round the spine through full range. Wakes up the thoracic spine and reduces morning stiffness.
Hold band at chest height with both hands. Pull apart until arms are fully extended to your sides. Activates rear delts and rhomboids — critical for posture and shoulder health.
Lie on your back, knees bent. Drive hips up, squeeze glutes hard at top, lower with control. Activates glutes before any lower body work.
Total warm-up time: approximately 6–8 minutes. Never skip it.
Exercise Descriptions — Read These Before Week 1
The program uses eight exercises across both sessions. Read through each description before you begin so you’re not learning technique and managing fatigue simultaneously on day one.
Goblet Squat
Hold one dumbbell vertically at your chest, both hands cupping the top end. Feet shoulder-width apart, toes turned out slightly. Push your knees out in the direction your toes point, sit your hips down and back like you’re lowering onto a low chair. Keep your chest tall throughout — if it falls forward, the weight is too heavy. Drive through your heels to stand. The dumbbell at your chest acts as a counterbalance that naturally keeps you upright.
Romanian Deadlift (RDL)
Stand holding dumbbells in front of your thighs, palms facing your legs. Soft bend in the knees — not locked, not deeply bent. Hinge at the hips: push them back as if someone is pulling a rope attached to your belt. Lower the dumbbells along your legs until you feel a significant pull in your hamstrings — typically around mid-shin. Don’t round your lower back. Drive your hips forward to stand, squeezing glutes at the top. This is a hinge movement, not a squat.
Single-Arm Dumbbell Row
Place one knee and the same-side hand on a bench or sturdy chair. Other foot on the floor. Hold a dumbbell in the free hand, arm hanging straight down. Pull the dumbbell up toward your hip — your elbow drives back and up, not out to the side. Lower with control over 2–3 seconds. Keep your back flat — don’t rotate your torso to get the weight up. If you need to twist to lift it, go lighter.
Dumbbell Floor Press
Lie on your back on the mat, knees bent, feet flat. Hold dumbbells at chest level, elbows at roughly 45 degrees from your body. Press the dumbbells up until your arms are straight. Lower until the backs of your upper arms touch the floor — that’s your full range of motion. The floor limits your range on the down phase, which actually makes this easier on the shoulder joint than a bench press. Good for beginners.
Dumbbell Shoulder Press
Sit upright on a bench or firm chair, or stand. Hold dumbbells at shoulder height, palms facing forward. Press straight up until your arms are almost fully extended — don’t lock out the elbows. Lower back to shoulder height with control. Keep your core engaged so your lower back doesn’t arch. If it does, you’re going too heavy or pressing from an unstable base.
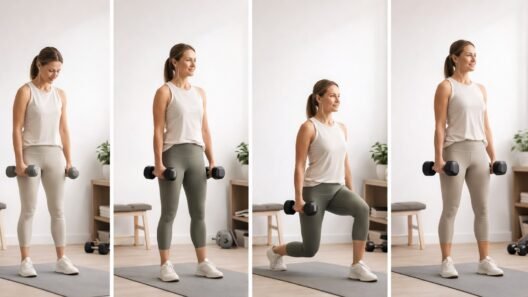
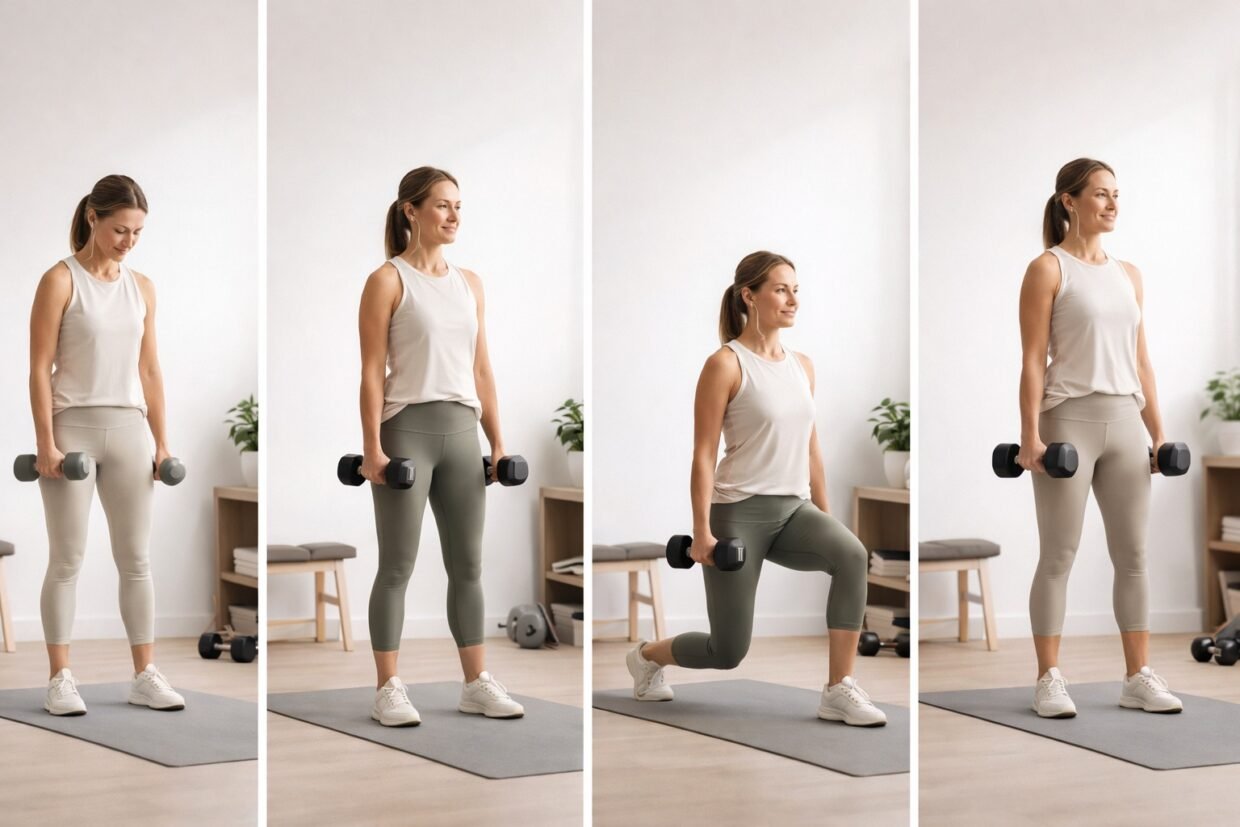
Dumbbell Reverse Lunge
Stand holding dumbbells at your sides. Step one foot backward and lower your back knee toward the floor — stop about an inch above it. Your front knee should be directly over your front ankle. Push through your front heel to return to standing. Reverse lunges are significantly gentler on the front knee than forward lunges, which is why they’re in this program rather than the standard forward version.
Dead Bug
Lie on your back, arms pointing straight up toward the ceiling, knees bent at 90 degrees with shins parallel to the floor. Press your lower back firmly into the mat and keep it there for the entire exercise. Slowly lower your right arm toward the floor behind your head while simultaneously extending your left leg out straight. Return to start. Repeat on the opposite side. The challenge is keeping your lower back pinned to the floor throughout. If it lifts, you’ve gone too far.
Farmer’s Carry
Hold a dumbbell in each hand at your sides, as if you’re carrying two heavy bags of shopping. Stand tall — shoulders back, chest up, chin slightly tucked. Walk slowly and deliberately for the prescribed distance. This exercise seems simple. It is deceptively hard when done with enough weight. Your core is working constantly to resist the pull of the dumbbells. Your posture is being trained. Your grip and forearm strength are building. Don’t underestimate it.
Week 1 — Learn the Movements
Week 1 has one job: learn the exercises. Not build muscle. Not get sore. Learn. The weights this week should feel easy. That’s intentional. Your nervous system needs to practice these movement patterns without the added complexity of fatigue. Every rep should feel controlled, not effortful.
Film yourself doing each exercise from the side on day one. Watch it back. Compare to the descriptions above. This is the single most effective technique check available to you without a personal trainer in the room. You will see things in the video that you can’t feel while you’re doing the movement.
Session A — Week 1
Do this on Day 1 and Day 5 of the week (e.g. Monday and Friday)
| Exercise | Sets | Reps | Rest | Tempo | Notes |
|---|---|---|---|---|---|
| Goblet Squat | 2 | 10 | 90 sec | 3 sec down, 1 sec up | Light weight. Focus on staying upright, knees tracking toes. |
| Single-Arm DB Row | 2 | 10 per side | 90 sec | 2 sec down | Full range — arm hangs straight before each rep. |
| DB Floor Press | 2 | 10 | 90 sec | 3 sec down, 1 sec up | Elbows at ~45° — not flared wide. |
| Dead Bug | 2 | 6 per side | 60 sec | Slow and controlled | Back must stay flat on mat. Reduce range if it lifts. |
| Farmer’s Carry | 2 | 20 meters | 60 sec | Slow walk | Shoulders back, tall posture throughout. |
Session B — Week 1
Do this on Day 3 of the week (e.g. Wednesday)
| Exercise | Sets | Reps | Rest | Tempo | Notes |
|---|---|---|---|---|---|
| Romanian Deadlift | 2 | 10 | 90 sec | 3 sec down, 1 sec up | Feel the stretch in hamstrings. Hinge at hips, not knees. |
| DB Shoulder Press | 2 | 10 | 90 sec | 2 sec down | Seated if balance is an issue. Core tight throughout. |
| DB Reverse Lunge | 2 | 8 per side | 90 sec | 3 sec down | Start with bodyweight if balance is challenging. |
| Band Pull-Apart | 2 | 15 | 60 sec | Controlled | Arms straight, pull through full range. Posture exercise. |
| Glute Bridge | 2 | 12 | 60 sec | 2 sec up, 2 sec hold, 2 sec down | Squeeze hard at the top. Drive through heels. |
Week 1 schedule: Session A → Rest → Session B → Rest → Session A → Rest → Rest
Week 2 — Build the Foundation
By week 2, the movements should start to feel familiar. Your nervous system has had a week to practice the patterns. Now we add a third set to each exercise and, if week 1 felt manageable throughout, we increase the weight slightly. The rule: if you could have done 5 more reps on your last set, go heavier. If the last 2 reps were genuinely hard, stay at the same weight.
Upper body exercises: add 2–3 lbs per dumbbell if week 1 felt manageable. Lower body exercises: add 3–5 lbs per dumbbell. These are small jumps — that’s correct. Resist the urge to jump more. A 5 lb increase on goblet squats is 10 lbs of added load per rep when you factor in both sides. That’s meaningful.
Session A — Week 2
Days 1 and 5 of the week
| Exercise | Sets | Reps | Rest | Change from Week 1 |
|---|---|---|---|---|
| Goblet Squat | 3 | 10 | 90 sec | Add 1 set. Increase weight if week 1 felt easy. |
| Single-Arm DB Row | 3 | 10 per side | 90 sec | Add 1 set. Focus on the eccentric — 3 sec lowering. |
| DB Floor Press | 3 | 10 | 90 sec | Add 1 set. Increase weight if form was solid. |
| Dead Bug | 3 | 8 per side | 60 sec | Add 1 set + 2 reps per side. |
| Farmer’s Carry | 3 | 25 meters | 60 sec | Add 1 set + 5 meters. Increase weight if posture held. |
Session B — Week 2
Day 3 of the week
| Exercise | Sets | Reps | Rest | Change from Week 1 |
|---|---|---|---|---|
| Romanian Deadlift | 3 | 10 | 90 sec | Add 1 set. Increase weight — hamstrings can handle more. |
| DB Shoulder Press | 3 | 10 | 90 sec | Add 1 set. Keep weight the same or increase by 2–3 lbs. |
| DB Reverse Lunge | 3 | 8 per side | 90 sec | Add 1 set. Add light dumbbells if you used bodyweight in week 1. |
| Band Pull-Apart | 3 | 15 | 60 sec | Add 1 set. Consider slightly heavier band. |
| Glute Bridge | 3 | 12 | 60 sec | Add 1 set. Hold a light dumbbell on your hips to add load. |
Week 2 schedule: Session A → Rest → Session B → Rest → Session A → Rest → Rest
Week 3 — Add Load and Volume
Week 3 is where training starts to feel real. The movements are familiar. Your body has adapted to the basic stimulus and is ready for more. We increase reps on some exercises, introduce a new exercise to each session, and continue progressing weight where the last 2 reps were genuinely challenging but achievable.
Expect soreness in week 3 — specifically in muscles that haven’t been challenged quite this way before. The new exercises and the increased volume create a new stimulus. This is normal and expected. Keep moving on rest days — a 20-minute walk is significantly better for recovery than sitting still.
Session A — Week 3
Days 1 and 5 of the week
| Exercise | Sets | Reps | Rest | Notes |
|---|---|---|---|---|
| Goblet Squat | 3 | 12 | 90 sec | Increase reps by 2. Increase weight if 10 felt easy last week. |
| Single-Arm DB Row | 3 | 12 per side | 90 sec | Increase reps. Focus on full shoulder blade retraction at the top. |
| DB Floor Press | 3 | 12 | 90 sec | Increase reps. Try a small weight increase if form is solid. |
| Dead Bug | 3 | 10 per side | 60 sec | Increase reps. Slow it down further — 3 seconds each direction. |
| Farmer’s Carry | 3 | 30 meters | 60 sec | Increase distance. Heavier dumbbells if posture is holding. |
| 🆕 Calf Raise | 2 | 15 | 45 sec | Stand on the edge of a step, hold wall for balance. Rise on toes, lower slowly. Important for bone density in the lower leg. |
Session B — Week 3
Day 3 of the week
| Exercise | Sets | Reps | Rest | Notes |
|---|---|---|---|---|
| Romanian Deadlift | 3 | 12 | 90 sec | Increase reps and weight. This is your most important strength exercise. |
| DB Shoulder Press | 3 | 12 | 90 sec | Increase reps. Shoulders respond well to volume. |
| DB Reverse Lunge | 3 | 10 per side | 90 sec | Increase reps. Increase dumbbell weight by 2–3 lbs if balance is solid. |
| Band Pull-Apart | 3 | 20 | 60 sec | Increase reps. This exercise rarely gets “heavy enough” — go up a band resistance instead. |
| Glute Bridge | 3 | 15 | 60 sec | Increase reps. Add a dumbbell on hips if not already doing so. |
| 🆕 Plank Hold | 2 | 20–30 sec | 60 sec | On forearms. Hips in line with shoulders — don’t let them sag or pike. Build from 20 seconds. This is harder than it looks done correctly. |
Week 3 schedule: Session A → Rest → Session B → Rest → Session A → Rest → Rest
Week 4 — Consolidate and Push
Week 4 is where you show yourself what you’re capable of. The movements are no longer new — they’re becoming familiar patterns. Your weights should be meaningfully heavier than week 1. Your reps should feel harder because you’re working harder, not because your form is breaking down.
This week we add a fourth set to the primary exercises and push to where the last 2 reps of every set are genuinely challenging — not impossible, not easy. That edge of hard is where the training signal is strongest. We also increase the plank hold time and introduce one final new exercise to each session.
Session A — Week 4
Days 1 and 5 of the week
| Exercise | Sets | Reps | Rest | Notes |
|---|---|---|---|---|
| Goblet Squat | 4 | 12 | 90 sec | Add a fourth set. This is your biggest lower body volume of the program. |
| Single-Arm DB Row | 4 | 12 per side | 90 sec | Add a fourth set. Weight should be heavier than week 1. |
| DB Floor Press | 4 | 10 | 90 sec | Reduce reps slightly, increase weight. Quality over quantity. |
| Dead Bug | 3 | 10 per side | 60 sec | Hold the extended position for 2 extra seconds before returning. |
| Farmer’s Carry | 3 | 35 meters | 60 sec | Heaviest weight you’ve used yet. Posture is everything. |
| Calf Raise | 3 | 15 | 45 sec | Three sets now. Slow and controlled — 3 seconds down on each rep. |
| 🆕 Lateral Band Walk | 2 | 12 steps each way | 60 sec | Place loop band just above knees. Feet shoulder-width, slight squat position. Step sideways, keeping tension in the band throughout. Targets glute medius — critical for hip stability and knee health. |
Session B — Week 4
Day 3 of the week
| Exercise | Sets | Reps | Rest | Notes |
|---|---|---|---|---|
| Romanian Deadlift | 4 | 10 | 90 sec | Add fourth set. Heaviest RDL weight of the program. |
| DB Shoulder Press | 4 | 10 | 90 sec | Add fourth set. Slightly heavier weight with slightly fewer reps. |
| DB Reverse Lunge | 3 | 10 per side | 90 sec | Maintain 3 sets. Increase weight by 2–3 lbs from last week. |
| Band Pull-Apart | 3 | 20 | 60 sec | Heavier band if the light band feels like nothing. |
| Glute Bridge | 3 | 15 | 60 sec | Pause for 3 full seconds at the top on every rep. |
| Plank Hold | 3 | 30–40 sec | 60 sec | Three sets now. Focus on not letting the hips sag. |
| 🆕 Dumbbell Curl | 2 | 12 | 60 sec | Stand or sit. Curl dumbbells to shoulder height, lower slowly — 3-second descent. A reward exercise for completing the program. Biceps are trained through all the rowing patterns, but direct arm work feels satisfying and is a genuine training tool. |
Week 4 schedule: Session A → Rest → Session B → Rest → Session A → Rest → Rest
Total training sessions across 4 weeks
Minutes per session including warm-up and cool-down
Core exercises mastered across the program
Heavier than week 1 by the time you finish
The Cool-Down Routine
Five minutes, every session, after your last exercise. Skipping the cool-down saves you five minutes and costs you flexibility progress and recovery speed. Don’t skip it.
Kneeling lunge position. Drop one knee to the floor, other foot forward at 90°. Push hips gently forward until you feel a stretch in the front of the kneeling side. This counteracts the shortening that happens from daily sitting.
Sit on the floor, one leg extended, the other bent with the foot against the inner thigh. Hinge at the hips and reach toward the extended foot until you feel the hamstring stretch. Don’t round your back to reach further — move from the hip.
Clasp hands behind your back, roll shoulders back and down, gently lift your arms behind you. Breathe deeply. Counteracts the forward shoulder posture that builds from pressing exercises and daily life.
Kneel on the mat, sit back toward your heels, extend arms forward on the floor. Breathe slowly and let the lower back decompress. One of the most effective post-training recovery positions for the spine.
Before you leave your training space: write down every exercise, weight used, sets, and reps completed. This takes 90 seconds and is the most important habit for long-term progress.
How to Progress After Week 4
Completing this 4-week program is a real achievement — but it’s also just the beginning. Your body has adapted to the training stimulus. To keep progressing, the training needs to keep evolving. Here’s how:
Option 1: Repeat the program with heavier weights
Go back to week 1 of this program using the weights you ended week 4 with — not the weights you started week 1 with. Apply the same progression rules. You’ll be surprised how much harder the same program feels when you’re starting from a stronger baseline.
Option 2: Increase to 4 training days
Split your training into upper body days and lower body days. This allows more volume per muscle group while still providing adequate recovery. An upper/lower split at 4 days per week is a natural progression from a 3-day full-body program.
Option 3: Upgrade your equipment
If you’ve been training with light dumbbells and resistance bands, a weight bench significantly expands what’s possible. See our Best Home Gym Equipment guide for tested recommendations at every budget.
Whatever you choose — the most important thing is that you don’t stop. The adaptation from 4 weeks of training is real but fragile. It requires continued stimulus to maintain and grow. Consistency over months and years is what produces the results that change how you look, how you feel, and how you move through the world.
Nutrition to Support This Program
Training is the stimulus. Nutrition is the raw material for the adaptation. You can do everything right in the gym and undermine it with inadequate nutrition — or you can amplify your results significantly by getting the basics right.
Protein — the non-negotiable
For women over 40 doing resistance training, research supports targeting 1.6–2.0g of protein per kilogram of bodyweight daily. For a 140-pound (63.5 kg) woman, that’s roughly 100–127g of protein per day. Distribute it across meals — 25–35g per meal is more effective than loading it all at dinner. If hitting this target through whole food is challenging, a protein supplement fills the gap efficiently. See our Best Protein Powders for Women Over 40 for tested options.
Eating around training
You don’t need a strict pre-workout meal protocol. A general rule: don’t train fasted if it makes you feel weak or dizzy — have a small carbohydrate-containing snack 60–90 minutes before if needed. After training, consume protein within 2 hours — this is when muscle protein synthesis is elevated and your muscles are most receptive to the amino acids needed for repair.
Hydration
Dehydration reduces strength output, slows recovery, and worsens next-day soreness. Target a minimum of 2 liters of water per day during this program, more on training days. If your urine is pale yellow, you’re well hydrated. If it’s dark yellow, drink more water.
Frequently Asked Questions
Yes — it’s specifically designed for beginners. Week 1 is deliberately light to allow you to learn the exercises without the complication of fatigue. The progression is gradual enough that your joints and connective tissue can adapt alongside your muscles. Read our How to Start Lifting Weights at 40 guide before your first session for full context on starting safely.
Don’t try to make it up by doubling up sessions. Just resume the next scheduled session as planned. One missed session in a 4-week program won’t meaningfully affect your progress. Two missed sessions in a week is more of a pattern to address — but the answer is still to resume normally, not to cram extra training. Consistency over weeks matters far more than any individual session.
Week 1: Expect noticeable soreness, especially in the glutes, hamstrings, and any muscles you’ve never deliberately trained. This is DOMS (delayed onset muscle soreness) — it peaks at 24–48 hours and resolves within 72 hours. Week 2: Soreness reduces significantly. Week 3: May return as you add new exercises. Week 4: Should feel like effort, not damage. The distinction: general muscle fatigue and a burning sensation during exercise is normal. Sharp pain in a joint, or pain that persists for more than 72 hours, is a signal to stop and evaluate.
Yes — walking is ideal on rest days. It promotes blood flow to recovering muscles without adding training stress. If you want to do more cardio (cycling, swimming, light jogging), do it on rest days or after your strength sessions, not before. Don’t do high-intensity cardio the day before a strength session if you’re still new to training — your recovery capacity is the limiting factor, not your motivation.
Stop the exercise immediately. There’s a difference between muscle burn (the working feeling of a loaded muscle — normal and expected) and joint pain (sharp, pinching, or persistent discomfort in a joint — a signal to stop). For most exercises in this program, a modification exists. Goblet squats hurting your knees: reduce depth. Floor press hurting your shoulder: adjust elbow angle to be more narrow. Romanian deadlifts creating lower back pain: reduce the range of motion by stopping before you feel your lower back round. When in doubt, reduce weight and range of motion before removing the exercise entirely.
No supplements are required. The program works on training stimulus and adequate whole-food nutrition. That said, two supplements have strong evidence for women over 40 doing resistance training: protein powder (to help hit daily protein targets) and creatine monohydrate (to increase muscle phosphocreatine stores and amplify training adaptations). See our reviews: Best Protein Powders for Women Over 40 and Is Creatine Safe for Women Over 40?
Understand the Foundation First
This program works best when you understand why each exercise is chosen and how progressive overload works. Our complete beginner’s guide covers all of that — including what to realistically expect in your first three months.
Medical disclaimer: This workout program is for informational and educational purposes only and does not constitute medical advice. Consult your healthcare provider before beginning any new exercise program, particularly if you have existing health conditions, joint issues, osteoporosis, cardiovascular concerns, or are recovering from injury. Exercise intensity should be adjusted based on your individual fitness level, health status, and physical capability.